Bees 'n Beans as a project has changed over its run, based on volunteer feedback and what worked / what didn't work so well each time. There will be a new blog for each year on the main page, but here is the old posts archive, for interest and examples!
And we are done! All the data collection for 2016 is in; all beans harvested and hopefully enjoyed after their weighing.
(I think. Possibly one or two more to arrive by post?)
I'm in the middle of wrapping up my other fieldwork right now, but will get on with curating and analysing asap. With three years of data under the project's proverbial belt, I'm hoping to get some wider analysis done as well once everything is sorted out - and I will be sure to let everyone know any findings.
A great many thanks to my volunteers throughout this work; I quite literally could not have done this without you all, and I hope you've found it fun, and interesting, to take part in.
The Garden Shop calculator is still available, giving you an idea of the value of your garden harvest, and how much your bees have contributed this year. The spreadsheet is downloadable here.
I'll be sending out an overall participation questionnaire shortly, so I can get the best idea about what worked best, or didn't work so well, so I can give the best reccomendations in my thesis about doing this work. And I will keep updating this webite, and the twitter, with news and info - so there's plenty more still to come from me!
Time for harvesting the beans is coming up (if you started your project as soon as the packs arrived, you may well be getting very close; otherwise in the next couple of weeks). A few people have done theirs already, and a good few more have been pipped to the post by slugs!
Now, in the previous years’ data, it seems that the number of pods and the number of beans in them is more closely related to the pollination received than the weight of the pods / beans (which is more related to the environmental conditions; how mature the pods are; how dried out they are; and so on). Since we are suffering even more slug / snail damage than previous years, I’ve decided to make a slight modification to the harvesting ‘rules’.
1) If you have already harvested, or are waiting for the 16 weeks / your beans to get a bit bigger, and you are fairly sure that they will make it to 16 weeks – then no worries, continue as originally instructed!
2) If your plants are getting battered, eaten, and you are worried that they are not going to make it to the 16 week mark, then you can harvest ALL the beans now / earlier. Please still do the counts AND the weights, but make a comment on the recording form that you had to harvest early.
Either way, still harvest all the pods at once, on all the plants, as this is what we have done in previous years – so to reduce overall variation, this should still be the method.
Hope that is clear! Do let me know if you’ve got any questions or problems.
New page live on this site (and the Buzz Club) - the Garden Shop calculator!
You might remember the 'Shopping in the Garden' project from 2015; well, this is the result of the great response and feedback we got from that. It is a free-to-download spreadsheet for you to record your crop yields, and the sheet will calculate:
- the total value of that yield (if you had bought it in a shop).
- the proportion and value that is directly as a result of bee (or other insect) pollination.
All we ask is that if you use it, and you can do so, you send us a filled-in copy at the end of the year so we can analyse the data.
There's a LOT more explaination on the page itself, so check it out if you're interested. And I will be around to answer any questions, as well.
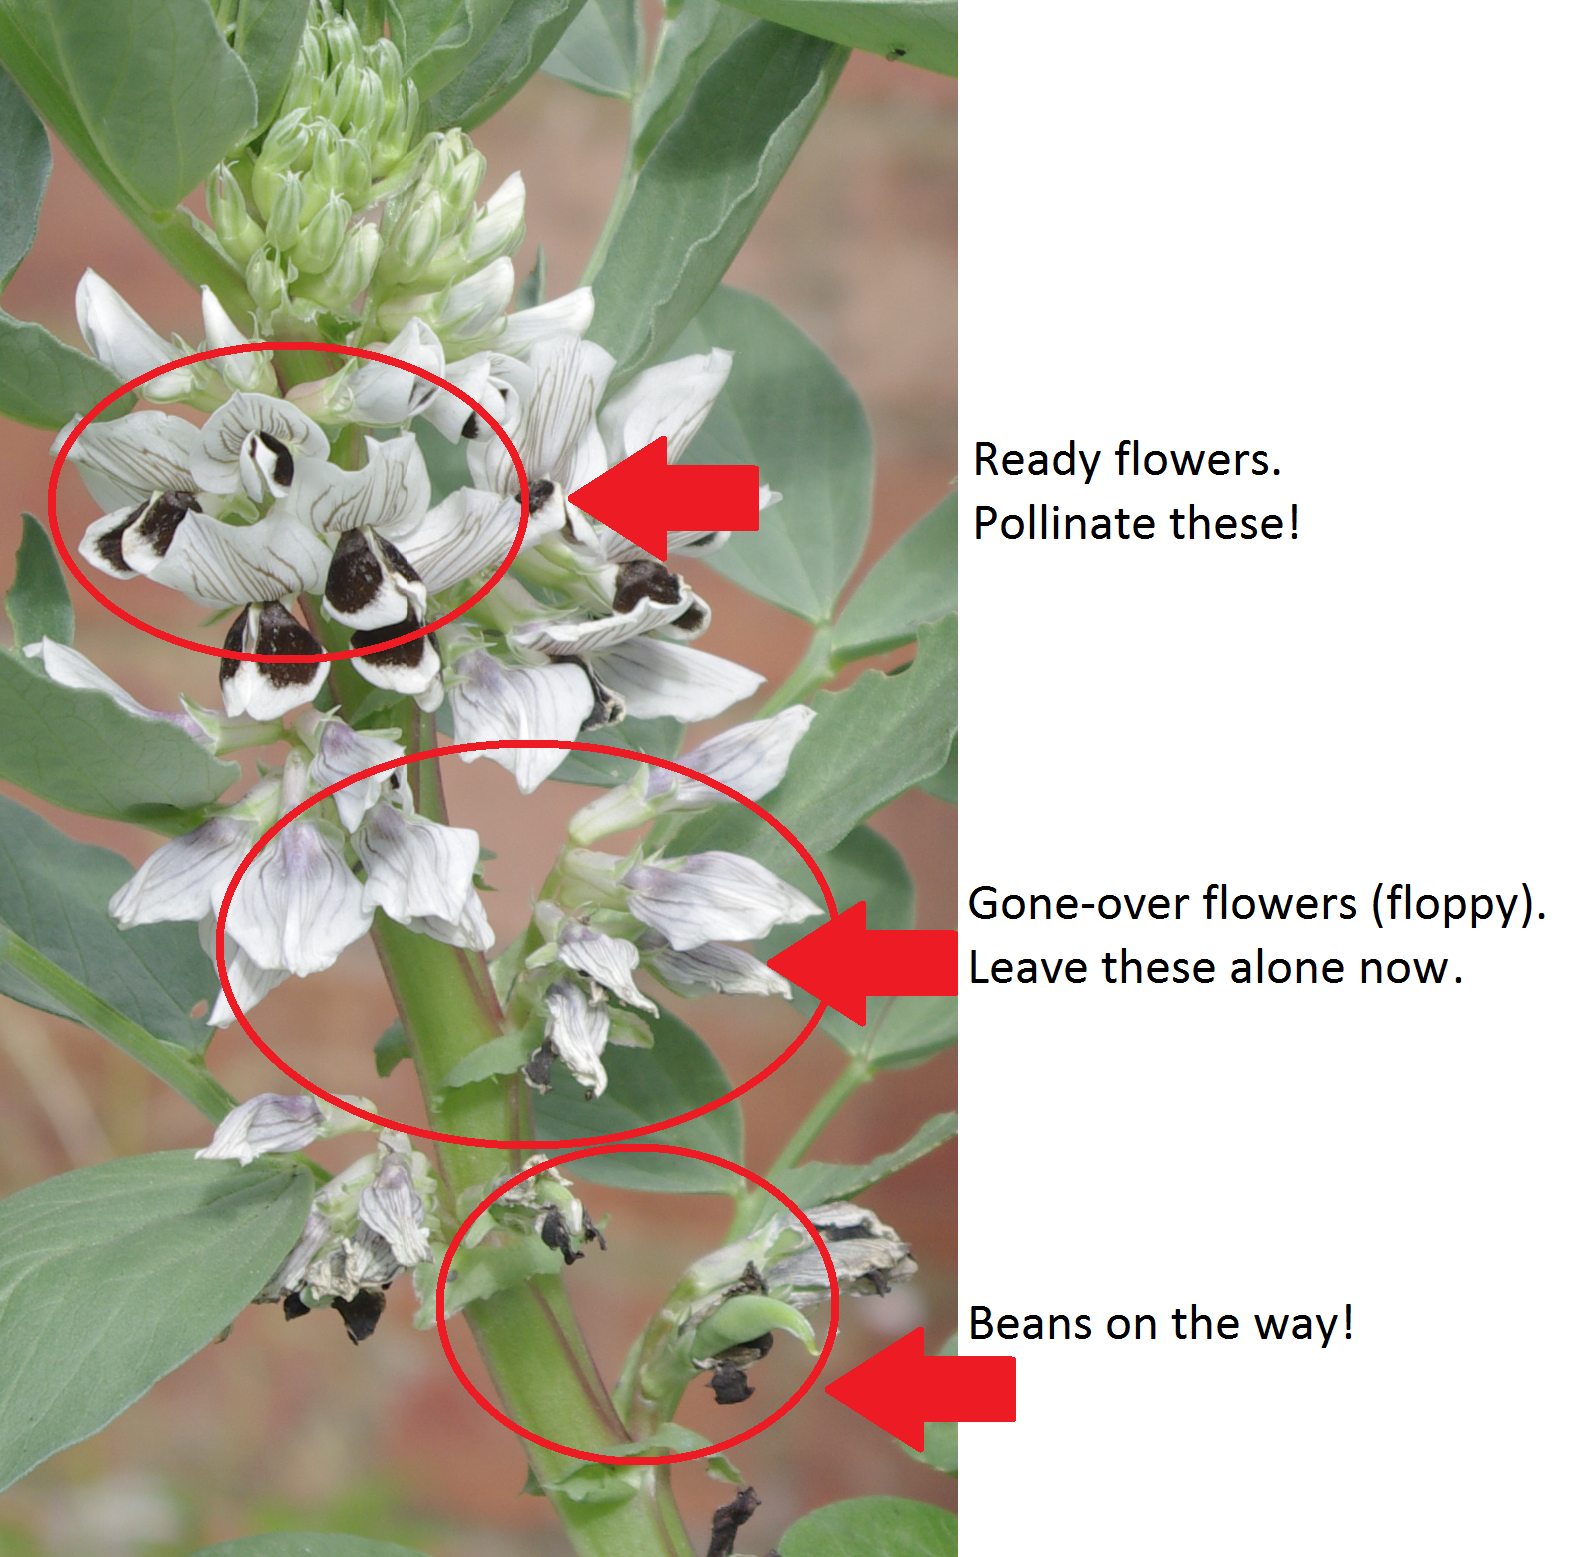
Some participants have reached the hand pollination stage of the project again this year, so I'm reposting the extra tips from last time, as they seemed to be useful.
Remember – we are NOT trying to cross-pollinate the flowers. Bean flowers are self-fertile and the pollen needs to be moved around inside the flower for this to work, so we use a hand pollination method known as 'tripping'. This involves carefully opening and closing the flowers to shift the pollen about inside. The instruction sheets have step-by-step photographs of this process (which can be downloaded again from the downloads page if yours have gone wandering!).
Given the flowers last about a week, and you will hand-pollinate twice per week, you will probably handle each individual flower ten times. So if you were doing your hand-pollinating on monday and thursday, for example, you would:
Monday - Open and close the flowers 5 times.
Thursday - Open and close the flowers another 5 times.
When each flower has gone grey / floppy, you don't need to hand-pollinate them anymore.

I do hope to get a new video this year, but my beans are a bit behind some people's, so for now I will link to the first one again. The video below should start playing at 1:48, and you only need to watch what I do until 2:10 (and I do it again 2:38 – 2:48). You don’t need to do the faffing around that happens afterwards with bits of other flowers, because we have shown over the course of the project that the tripping method is equally effective!
Once again, we're somewhere in week 6-8 (depending on when you started), so some of you might be seeing flower buds on your bean plants, particularly those in the South. If you're nowhere near flowering yet don't worry, the beans will take longer to grow in cooler areas, so just remember this for later. It looks from your twitter photos that the plants are coming up nicely, which is great to see!
Bagging in the soil
So, the 'twist' to the project this year is the additional repeat of plants grown in the soil directly, rather than just in pots. Most of the methods for doing the beans experiment are the same, regardless of where the plants are being grown, but putting bags on in-soil plants is a bit trickier than on the potted plants (mostly because you can't tuck the fleece underneath). So, this is one way to do it, for anyone having trouble:
1) Plant the selected bean in the soil, and fill back in the hole firmly.
2) Insert garden cane firmly into the soil alongside the bean, to support it.
3) Tie the bean loosely to the cane. The stem will need to expand as it grows, so leave plenty of space.
4) If you are using slug deterrants, place them around the base of the bean (pictured below are egg shells and wool pellets).
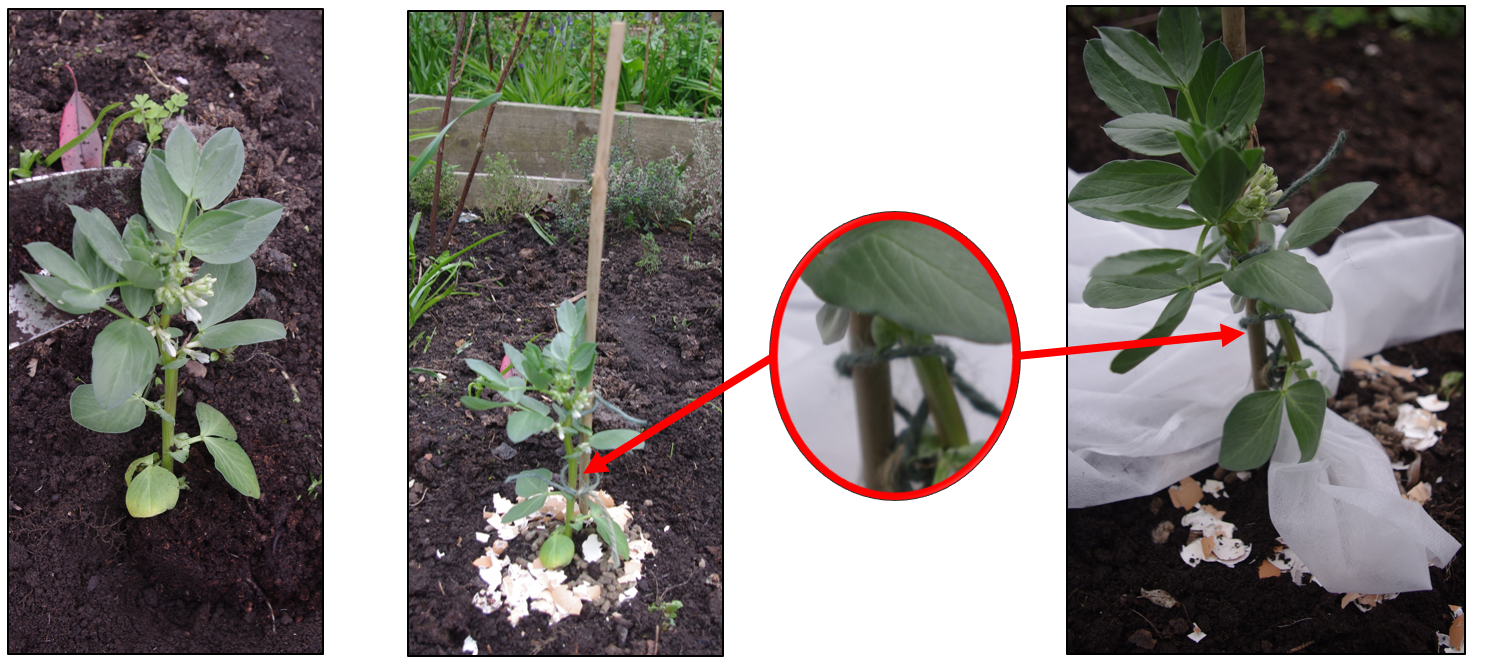
5) Place the fleece on the ground around the bottom of the bean plant.
6) There will be a small gap between the base of the plant and the stick. Push the fleece in this space to block it up or you will leave a hole for crawling insects.
7) Tie the fleece in place at the plant base.
8) Wrap the fleece around the bean and tie string securely at the top of the stick.
9) Hold the open side together with several clothes pegs or plastic ‘clippits’ to keep the fleece in place around the plant. The below example is on quite tight because of the weather, but can be loosened as the plant grows, and the wind lessens!

 One of the challenges we've all faced in the last few years of Bees 'n Beans has been the hungry attentions of slugs and snails. And, if your gardens are anything like mine, this isn’t a problem confined to your beans.
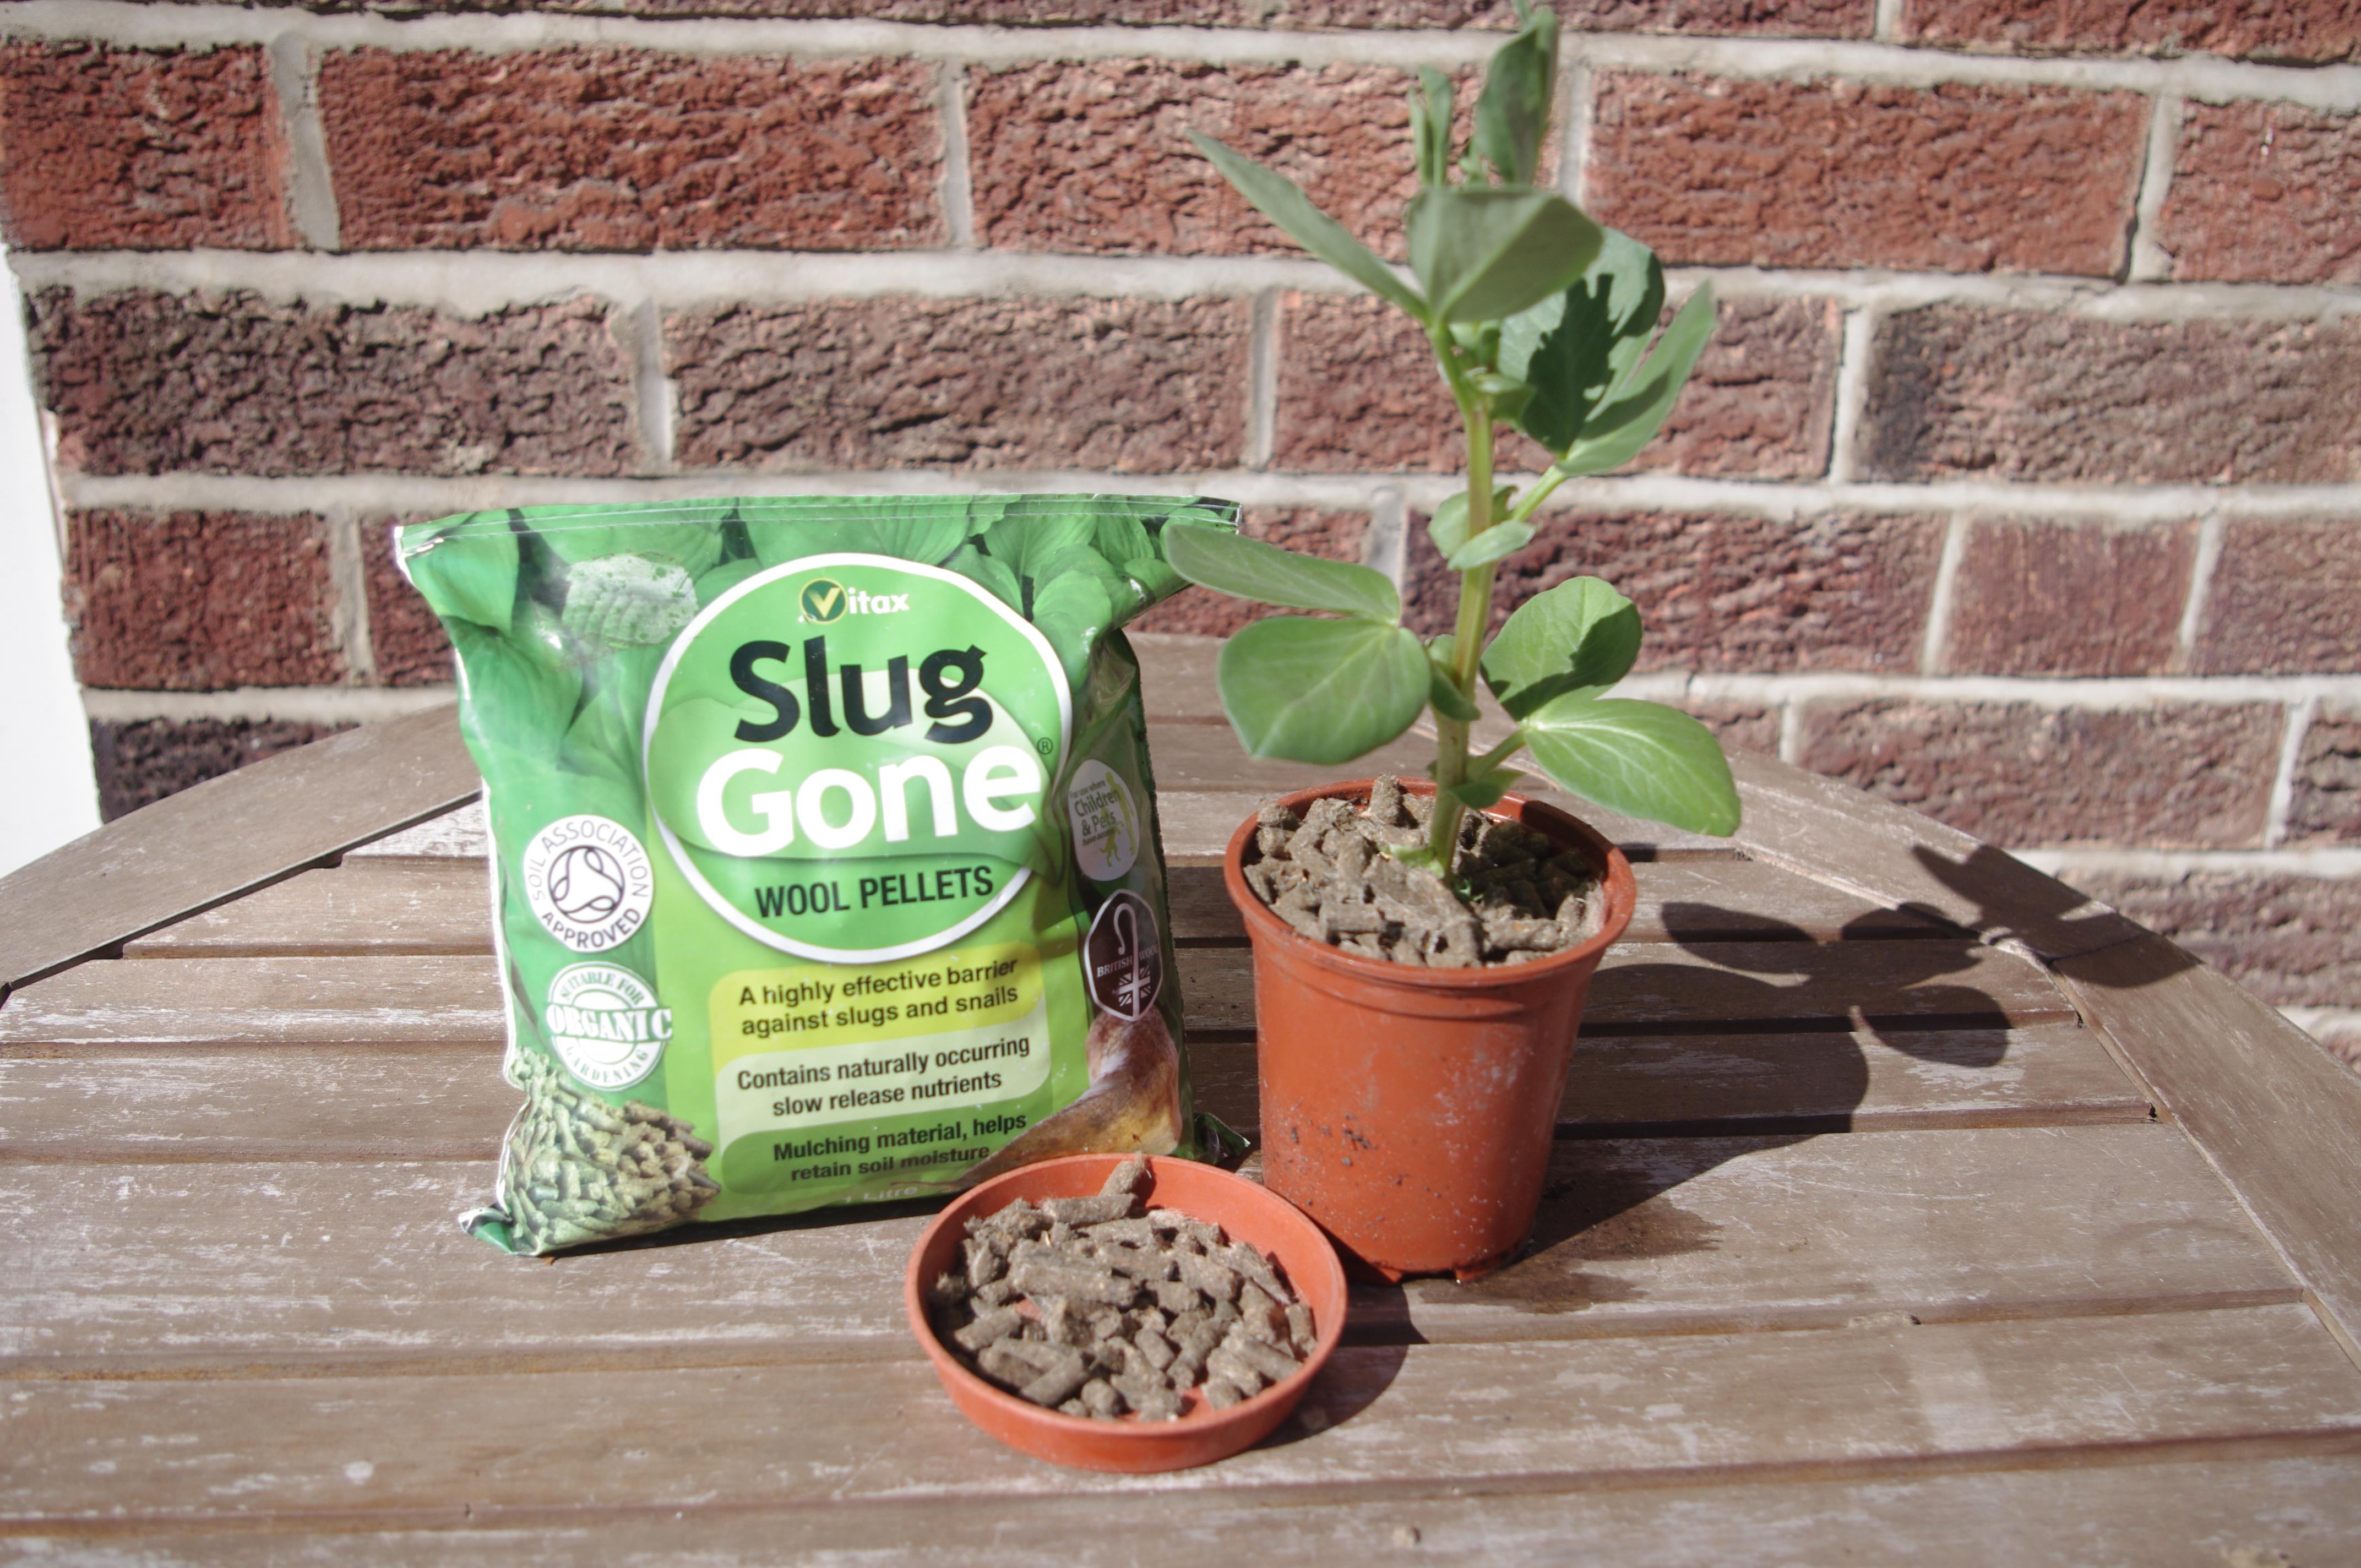
There are lots of ways to fight back against these pests (the downloads page has a pdf of suggestions if you are wondering where to start), but another one has been brought to my attention, with a couple of folks saying they found it really useful last year: Sheep’s wool pellets.
Basically, you scatter the wool pellets around the base of the plant and water them; they then swell up into a ‘carpet’ that is unpleasant for slugs and snails to cross. Smells a little bit of wet sheep, but not in an overpowering way in the greenhouse / garden (although I suggest it’s not a windowsill-friendly product). I hadn’t heard of this before, so after recommendations from volunteers in 2015 I’m going to give them a go this year, with some of my more apparently-delicious plants.
I’ll let you know how it turns out. If you’ve got any experience of these, or other tips for your fellow Bee Scientists, do let me know and I will pass them on!
We have a new project for this summer, looking for sign-ups now! Looking for gardens in Brighton & Hove, with owners who have time to look after 2 or 3 tomato plants for a month, in July (which we'll provide in pots). We are looking to see if growing ‘bee-friendly’ flowers (or any flowers, really) close to crop plants can improve their harvest.
More information on the Project Page. Happy to answer any questions!
-Linda
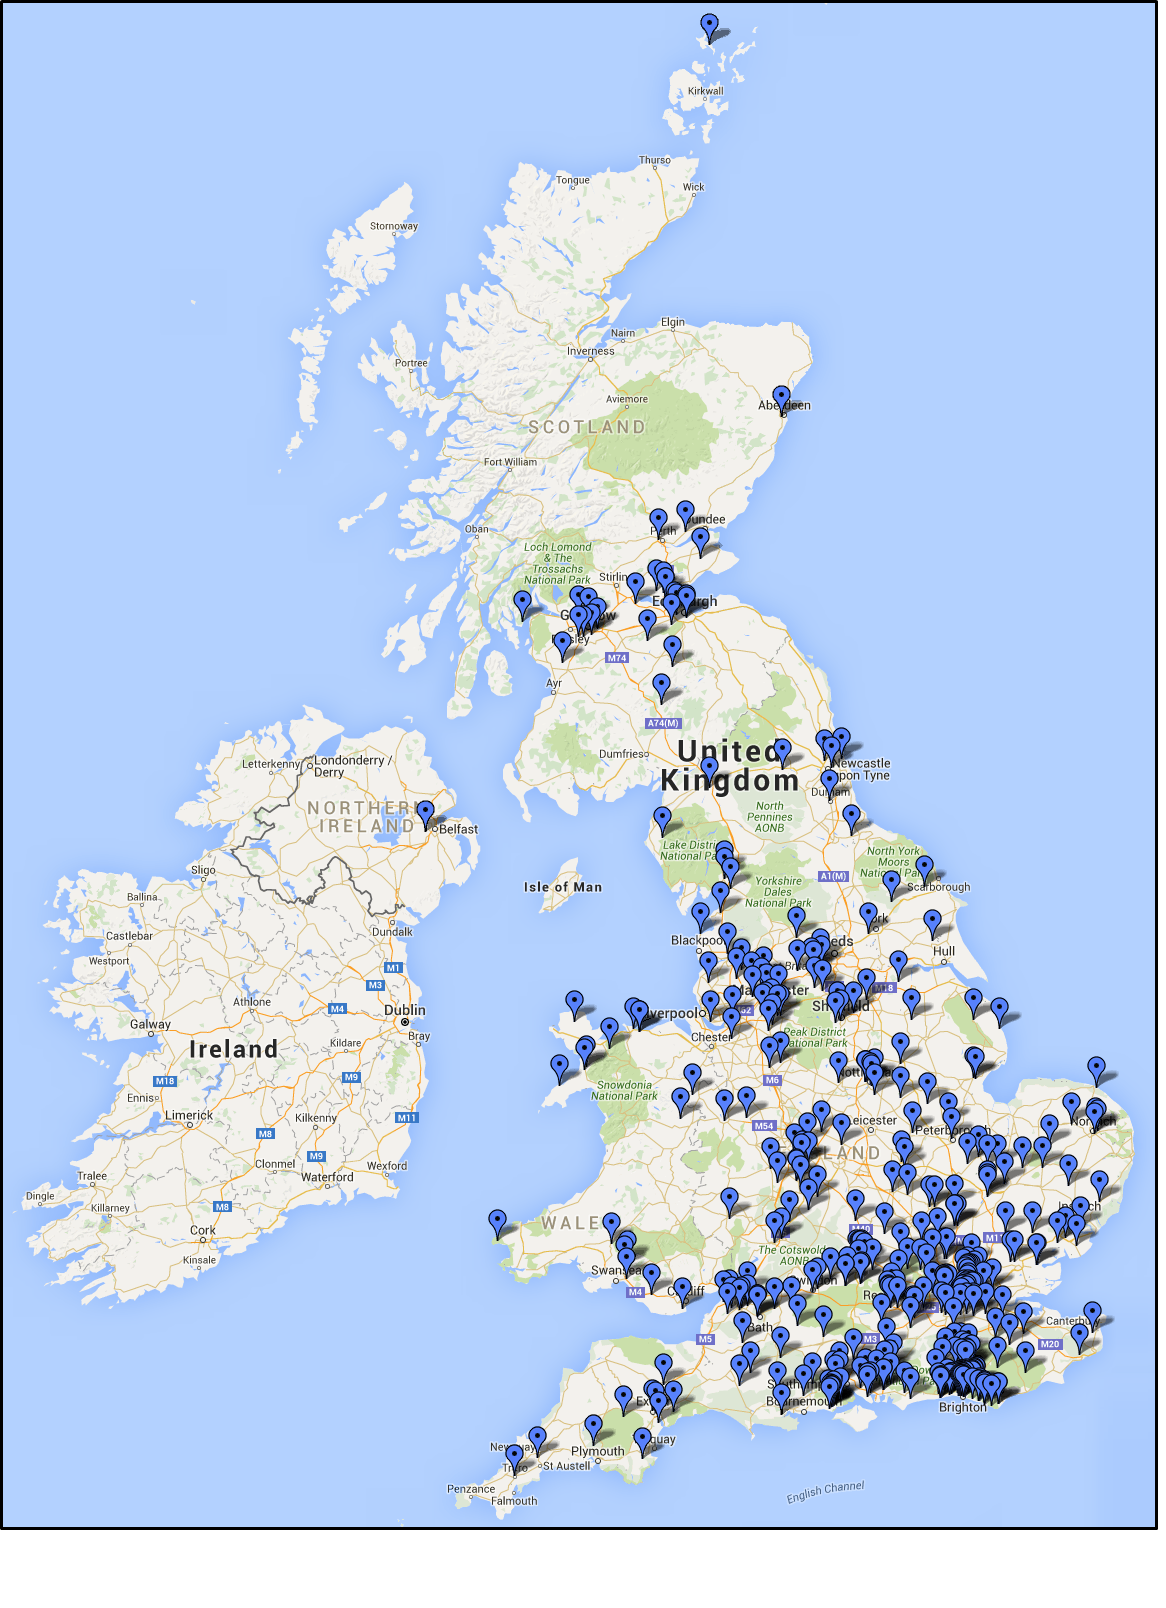
After a week of counting and packing - all the kits for Bees 'n Beans 2016 should be winging their way across the UK to this year's batch of Bee Scientists!
Thank you very much to everyone who has signed up. Once again we've got a great distribution of folks taking part, as shown in the map below. I'm looking forward to getting started with this third year, and will be here to answer any questions you might have about the project, or my work in general.
(And if anyone still fancies signing up, I do have some spare kits left over from the Great Packing, so I could scoot you one out sharpish!)
Sign ups are now open for Bees 'n Beans 2016!
The 'twist' this year will be asking participants to grow plants both in pots, and in the (dug-over) soil in their gardens / allotments. The idea of using the pots only in previous years was to standardise the amount of soil and nutrients that the plants received, but the drawbacks in practise seem to be the risk of drying out, and potential limitation of the growing plants by root space. Feedback from last year suggested that spare plants that some participants planted in the soil were studier and didn't suffer from drying out anywhere near as much, so this time round we're going to see if possible improved survivability of the plants outweighs the extra variation from being in the ground.
We are also asking people to provide their own 3L pots this year, rather than including the foldable plastic ones. These performed very well, but may not be necessary, and this way we can afford to send out more seeds and still have enough kits for everyone to take part again.
You can still sign up even if you only have space for beans in pots, or beans in the soil, but if we get over the 500 participants we will have to give preference to those who can do both. Although we do have a lot of seeds, so that's probably not going to be an issue, so don't let it put you off!
If you're interested in taking part in this project, please sign up below. Or if the embedded form is not showing up, the direct link is here.
Hello once more, Bee Scientists and other interested folks! Hope you all had an enjoyable festive season and new year. Remember to keep an eye out for winter-flying pollinators in this weirdly-warm weather, particularly in urban areas.
Bees 'n Beans is back for 2016, and we have some exciting plans in development for these projects. So, we are back on email / twitter, ready to answer your questions and get started on this year's projects.
The 'Need for Bees' gardening survey is now closed for 2015. Only one experiment still running for this field season, so I'd better get my Statistics hat on!
Thank you very much to everyone who has taken part in my projects this year. I couldn't do this without you all and your enthusiasm!
-Linda
And – we’re done!
Thank you all so much to everyone who took part in Bees ‘n Beans in 2015, be(e) it from your garden, your questions, tweets or general engagement - it's been great to run this project again. Despite the cold spring, the blackfly invasion, and all manner of animal saboteurs (with fox cubs being the cutest culprits, and a herd of beef cattle the most surprising), we’ve got more results back in now than we did last year. PLUS the data from the radishes; which were a bit more fiddly than I’d expected, but I hope you had fun trying them out.
Fantastic work, everyone!
There are a couple more things that would be great if you could do this year, to support the project (and my PhD!), if you have a bit of time.
Participation review
I have put together a very short, anonymous questionnaire to ask about 'participation' in Bees 'n Beans - no matter what stage you were able to get to. This will let me get a good idea of how well received the project was overall, and how viable it will be to push for it to continue after my PhD finishes. It also has a comment box for feedback if you want to keep it anonymous, or you can always email me and let me know what you thought of the project this year.
Create your own user feedback survey
The Need for Bees
Update: This project is now closed for 2015. Thank you to everyone who took part!
That's it!
Again, huge thanks to everyone for taking part – I quite literally couldn’t do this project without your efforts, and I do hope you’ve found it a fun and interesting thing to take part in!
Bees ‘n Beans will be running again next year, so if you would like to take part again, watch this space. And if you’re looking for more citizen science experiments for home or schools, do check out our new charity / club from Sussex University - The Buzz Club (http://thebuzzclub.uk/). Projects hopefully from myself and other members of the Goulson Lab group, looking at all sorts of pollinators, and finding out what we can best to do help insects in our own gardens.
I’ll still be tweeting and blogging here and on twitter, so do send me your bee questions or comments - I’ll do my best to answer!

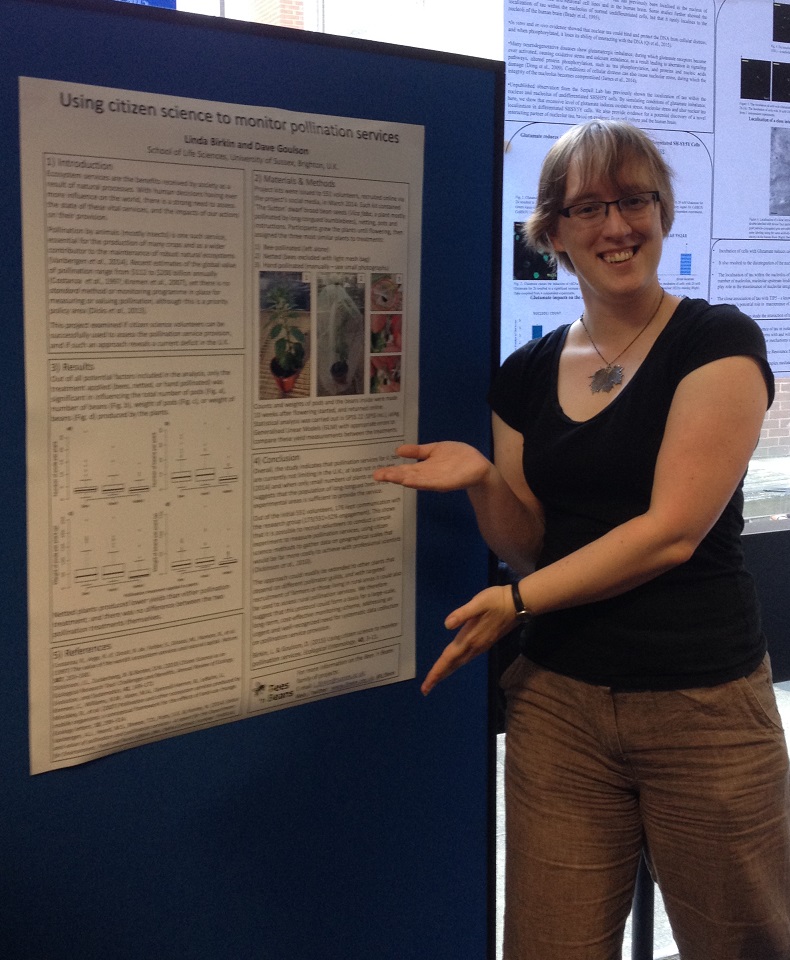
It's been the Sussex postgraduate student colloquium this week - two days of presentations and posters from current PhD students, so we can all see what each other have been up to. Bees 'n Beans making its first appearance in official poster form!
(Well, the method is on holiday - I'm still in rather rainy Brighton. But you can live vicariously!)
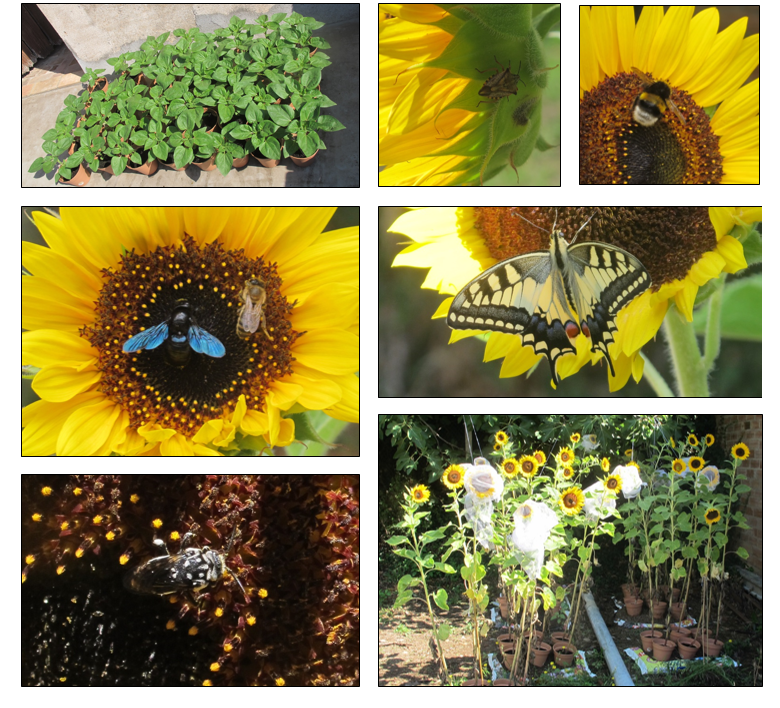
Here are some photos from Antonia Taylor, who is using a modified Bees 'n Beans protocol for her Baccalaureate project - in sunny Spain, with even sunnier flowers as the experimental plant. Looks like an excellent setup. She's snapped some fantastic pictures of flower visitors over the course of the experiment, and kindly agreed to share them.
Hope your teacher is as impressed as we are, Antonia!
Both recording forms are now online and open!
These are the full protocol forms, if you were able to grow all the plants needed for the experiment. Don't worry if your experiment for either plant isn't at harvesting time yet (although beans should be getting pretty close everywhere). I'm going to keep the recording forms open until the end of September to make sure I get everyone!
Note, for the radishes, if you have been harvesting more frequently than once a fortnight (as you might have done, particularly if your plants were growing quickly and you were harvesting the pods for eating), the best thing to do is add up all the harvests for each block (end of week 1, end of week 3 and so on), and record that.
If you have already posted me your data, then don’t worry, I don’t need you to fill it in twice!
For those who haven’t managed the full radish protocol, I suggested before how you can collect data even if you didn’t get all four radish plants to grow. The idea is to count the number of pods produced by the plants you do have, and also the leftover ‘spikes’ that are left behind after a flower hasn’t been pollinated enough.
If you have been growing plants for this extra count – thank you for sticking with it! I have opened a separate collector for that data. This will let me get an idea of what percentage of flowers actually get pollinated by the local insects.
If you have done the FULL protocol, it would be great if you were able to do the additional count (above) as well by counting leftover unpollinated spikes when your plants have gone over (the extra data will make the final analyses on percentage pollination better). You don’t need to count the spikes from the ‘spare’ plant 4, just the experimental ones.
If so, please also use the same form and method for this extra data. If you’d prefer not to, or you’ve already sent the data in / disposed of the plants, don’t worry; this is an extra thing I’ve thought of mid-project, so it’s an extra ask!
Now that flower spikes are actually starting on the radish plants, a couple of questions have come up:
1) 'Turnip'-like roots. The radishes do produce a large white / green root that can look remarkably turnip-like - don't worry! This is normal, as once the flower spikes get going the plants often lose most of their leaves. The big root supports the flowering and seed production, although it isn't edible.
2) Tall flowers. The flower spikes on the radish plants get get pretty tall, and may need a full-length garden cane to support them. But this doesn't mean you need as much fleece to keep the bagged plant covered as you might think, as the flowers will still only be open at the top of the plant, and you do not need to cover the leaves at the bottom. The photos below show how to move fleece up the plant as they start to stretch up:
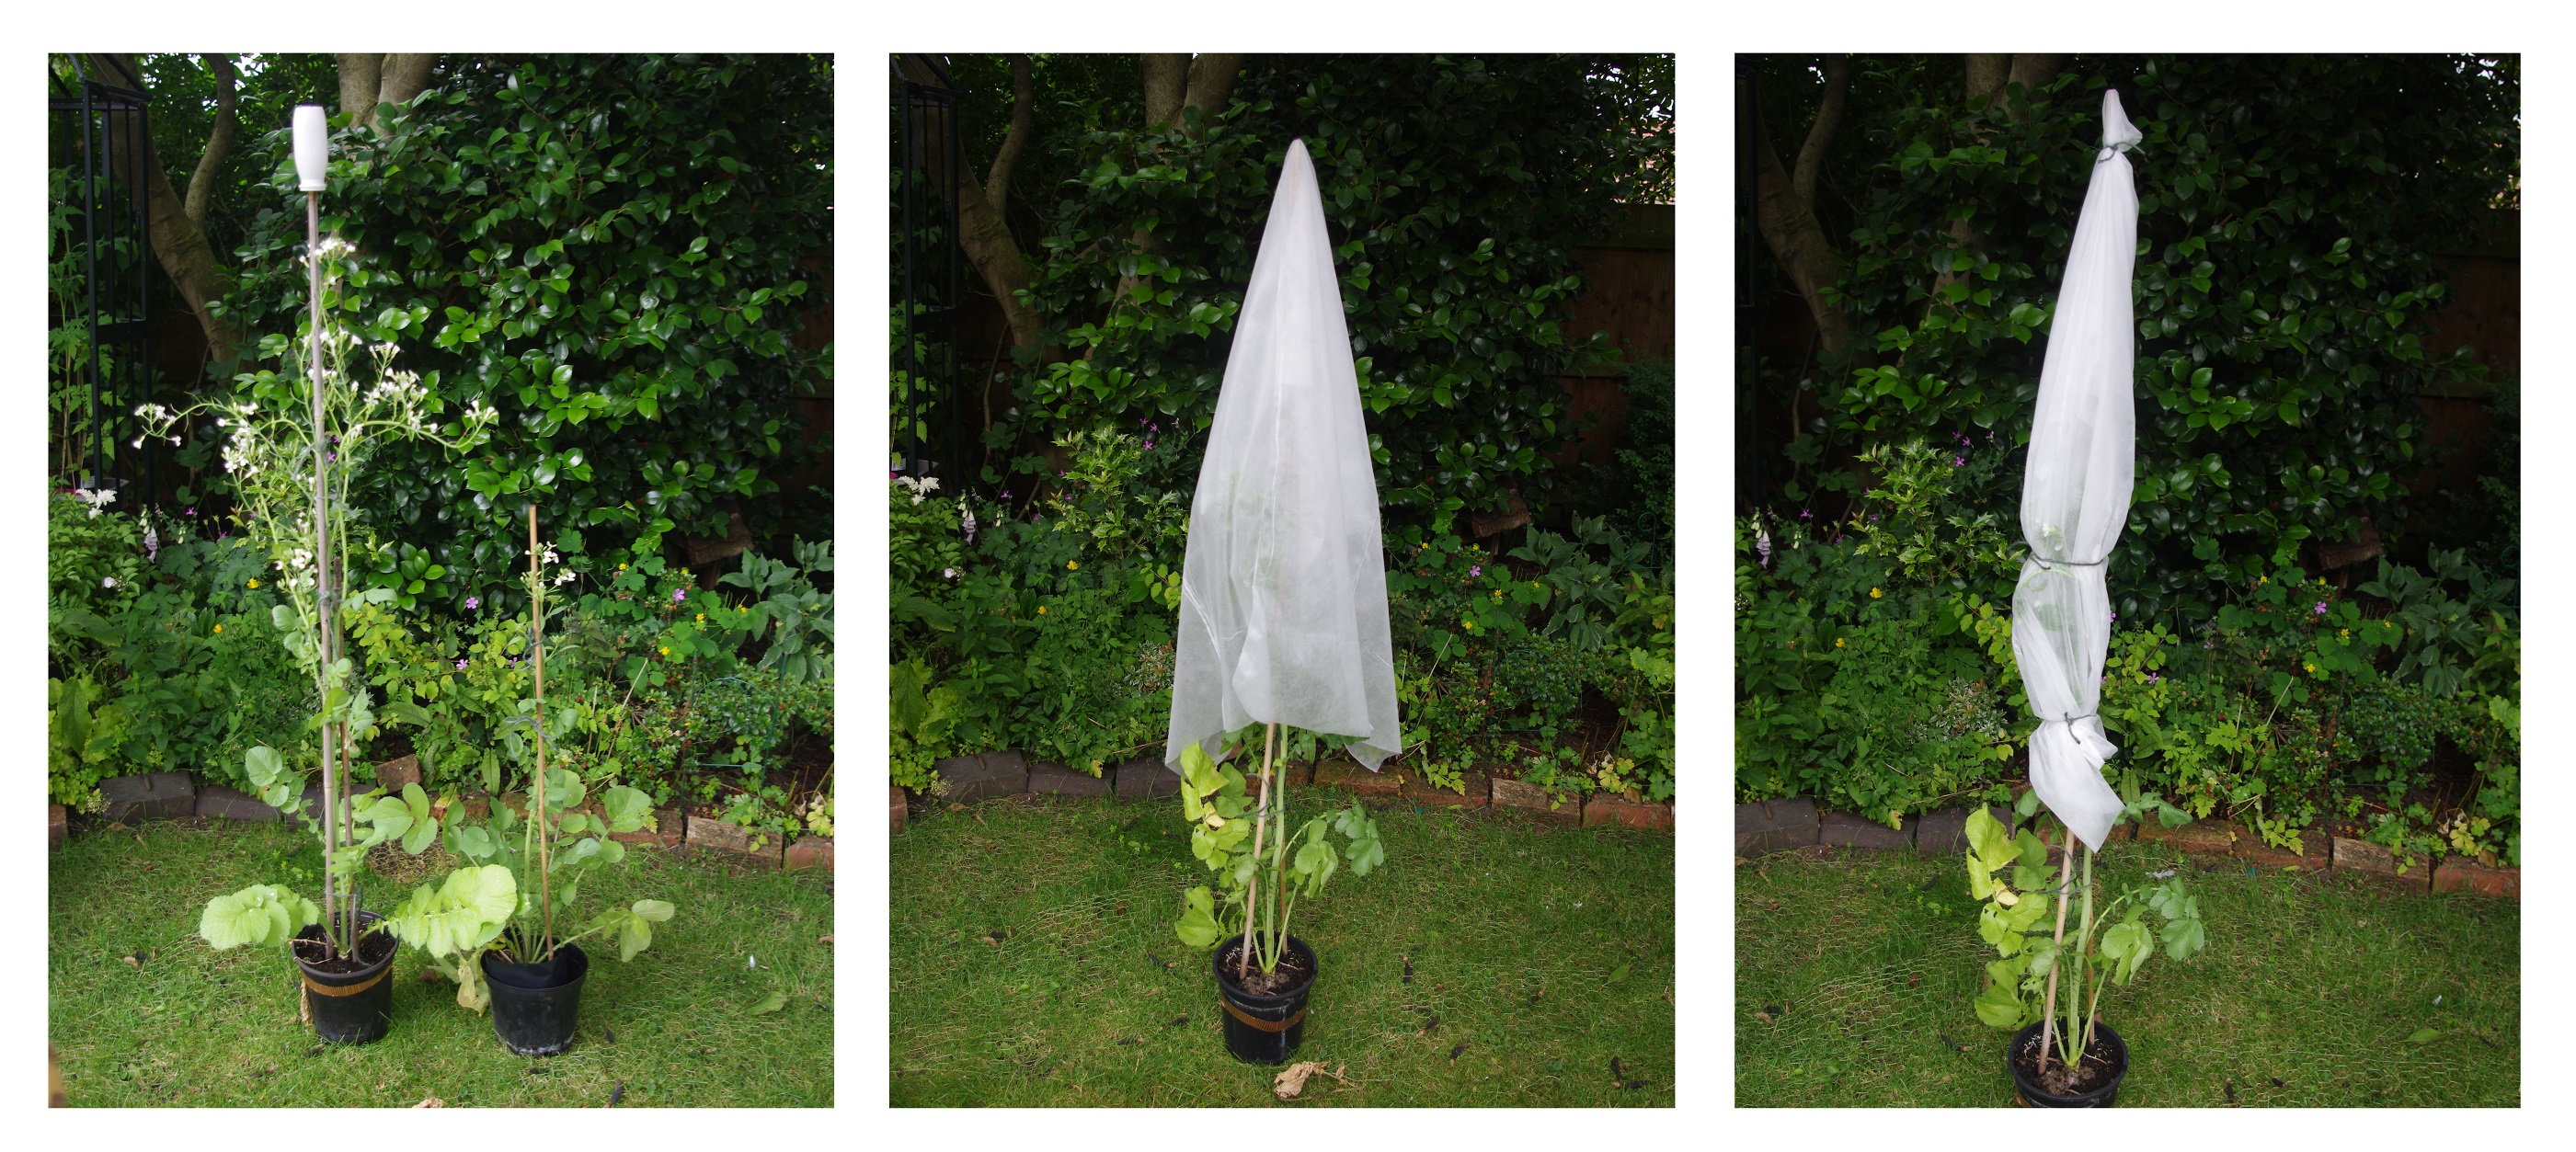
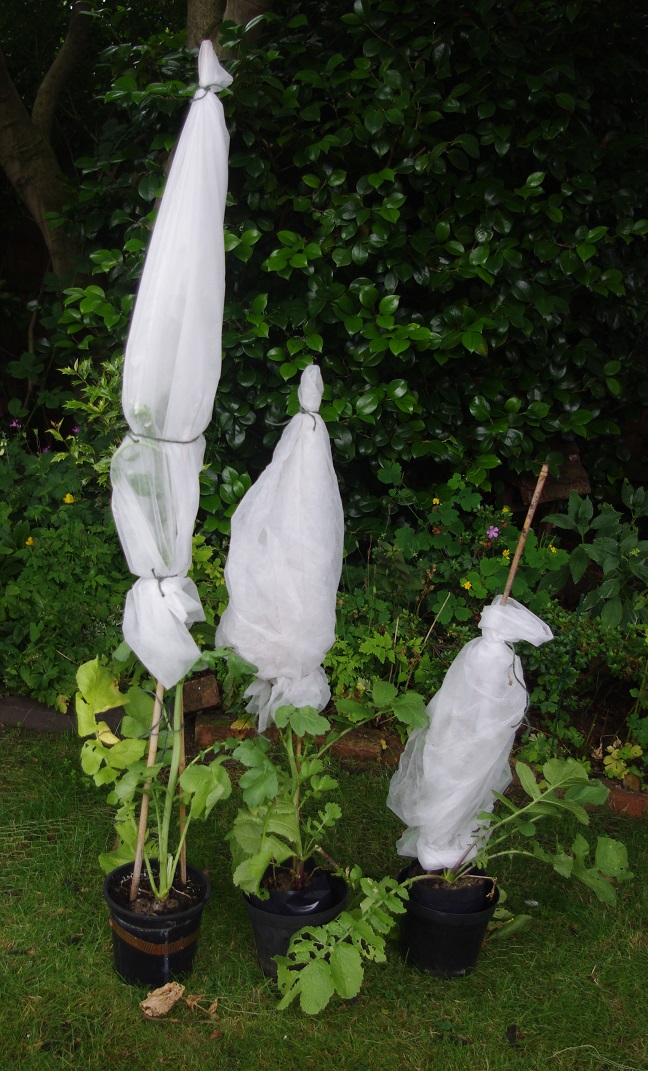
So your radishes may well end up with a rising hat as they get taller!
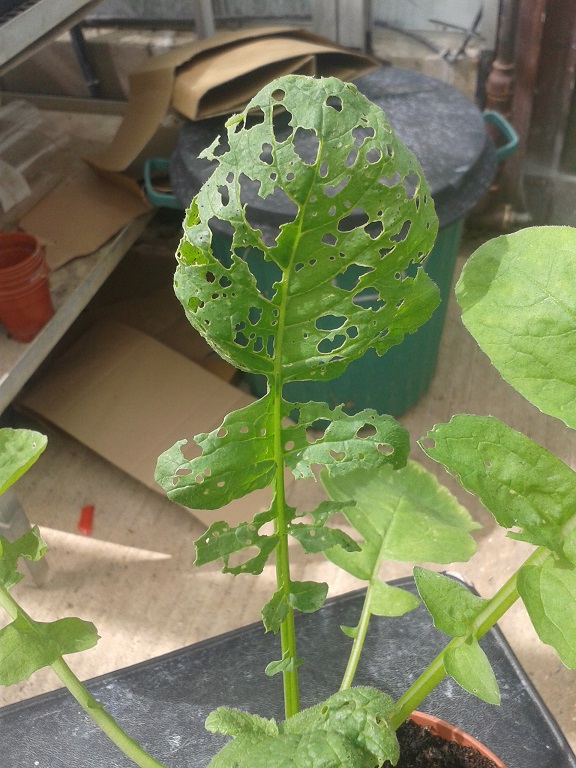
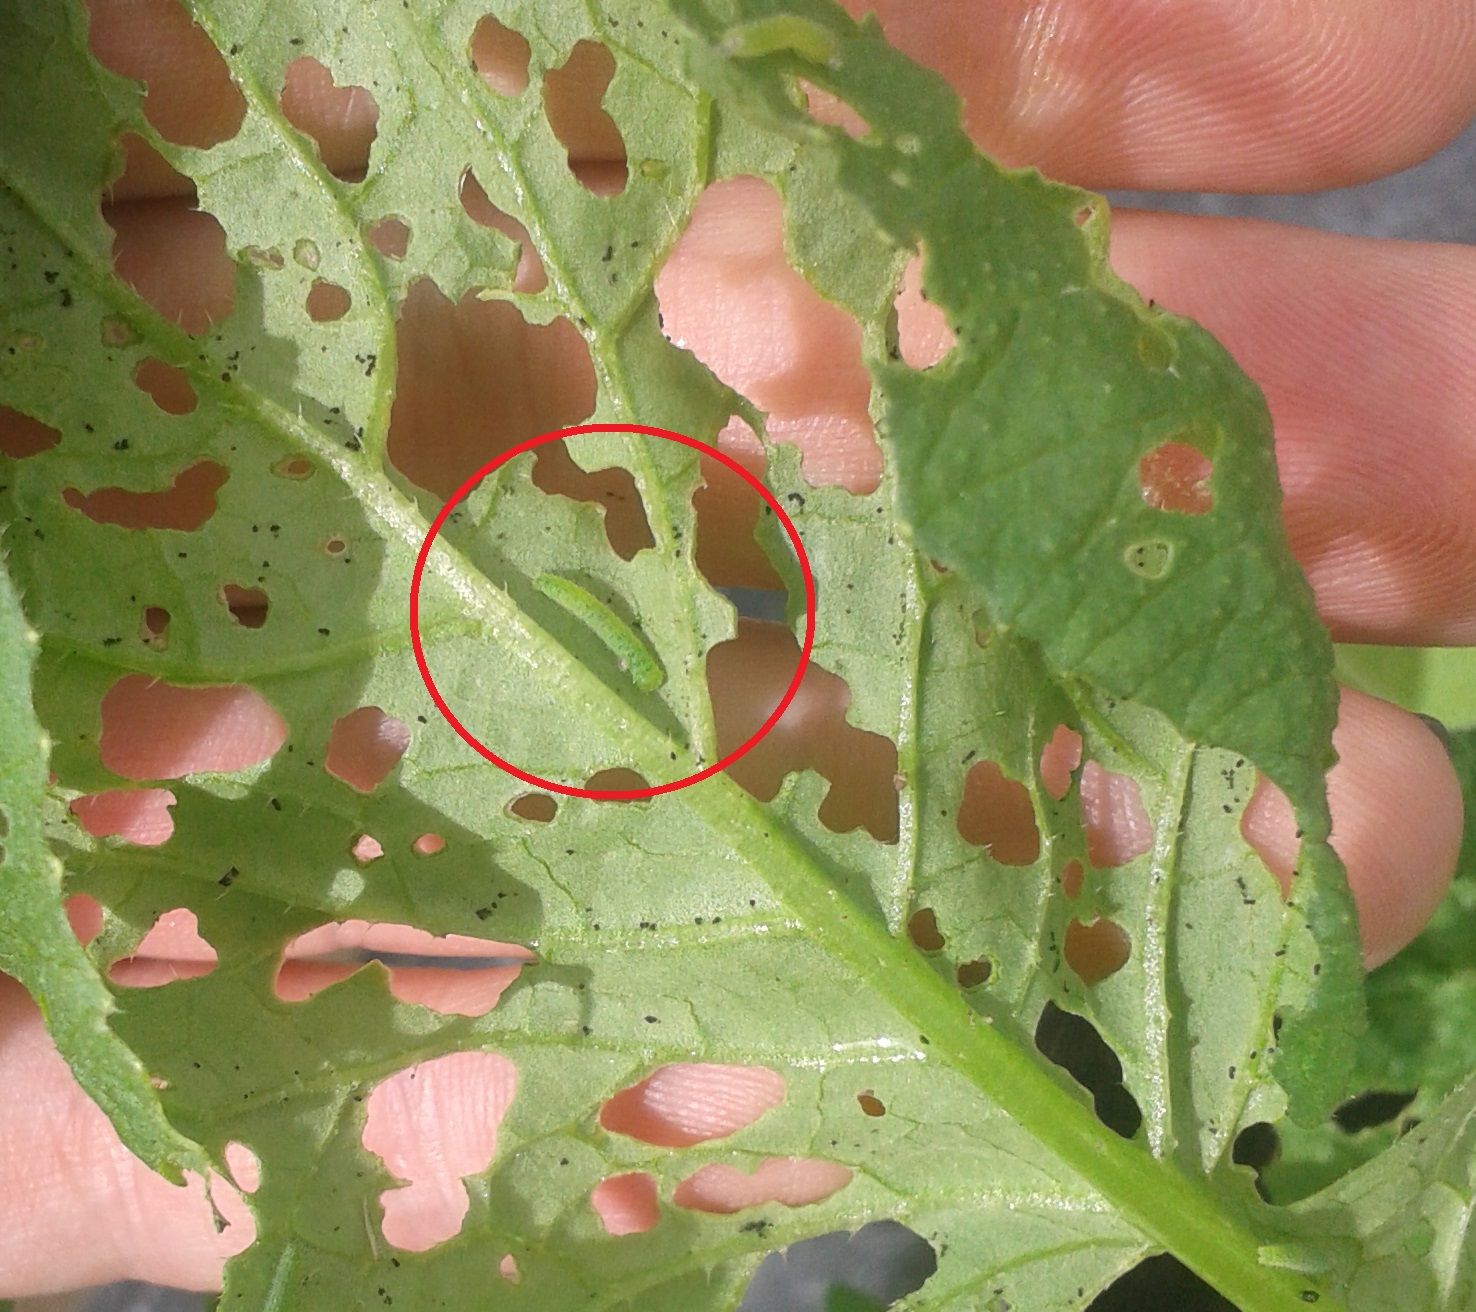
3) Pests! At this stage the radish leaves should be pretty resistant to slugs and snails (although they will probably still have a go at damaged or dying leaves), but because it has taken a while for the plants to actually get going this year, this means they are at risk from cabbage whites and other butterflies that lay eggs on brassicas. If you start to notice little holes in the leaves like those below:
I’ve had a few queries asking what to do if there are not four radish plants flowering at the same time.
It does seem that under normal garden conditions there is quite a lot of variation in when the radishes flower, even from plants that were sown at the same time. For example one plant might be much further ahead of the others.
These problems did not happen last year when we first used the plants under more controlled conditions, so many thanks to those of you that have raised the questions. An important aspect of this year’s radish experiment is to assess how they behave in a large number of domestic growing spaces so knowing what is happening out there is really important.
The laboratory group has discussed the problem and I have provided an advice sheet (2 pages) if you are having issues with getting enough flowering radishes. This sheet can be downloaded here, and tells you how to modify your experiment to work around uncooperative radishes!

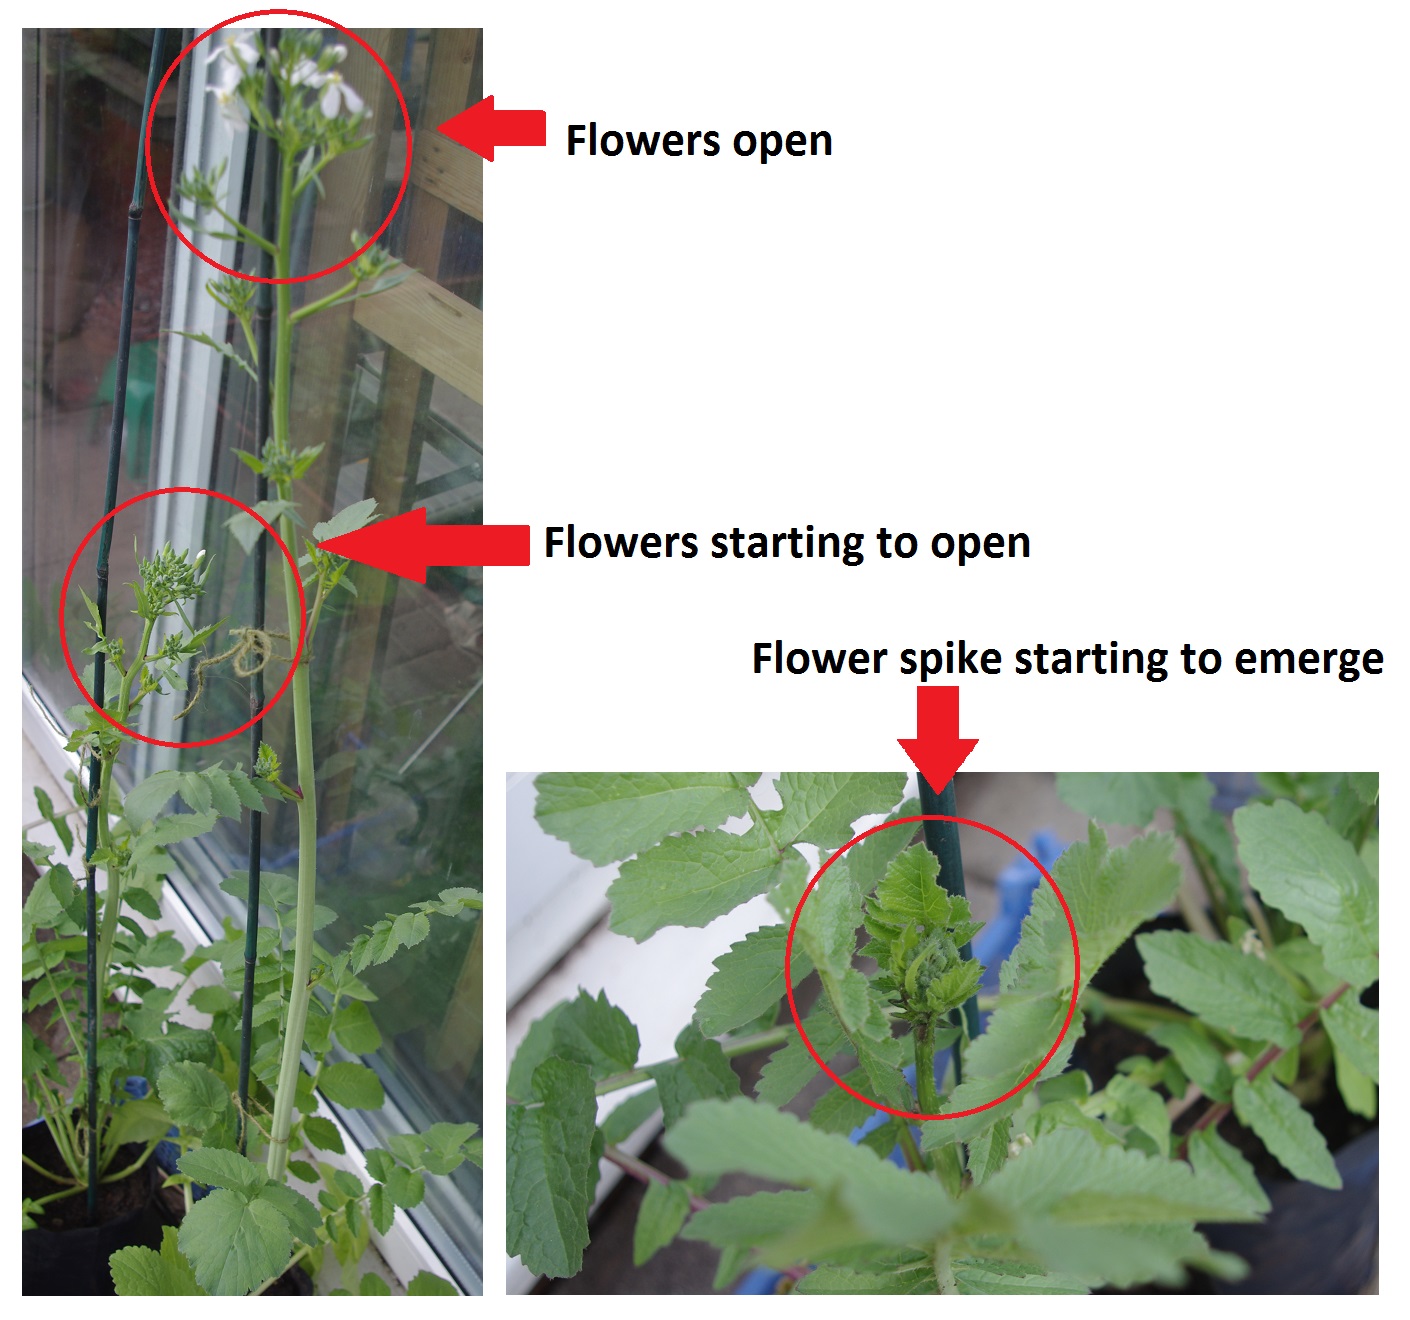
I've had some handy photos sent in showing the radishes at different stages, so this is what you should be looking out for. The plants do seem to be being quite variable in how they grow and how fast they produce a flower spike - I am having a think about modifications to the protocol that can be done if yours are being uncooperative, and will get back to the list this week with my ideas.
For now though, thank you Rita, and here are what the radishes should eventually be showing! Click on the pictures to zoom in.
There still seems to be some confusion about the hand-pollinating method (although honestly as long as you're handling the plants a bit, you're probably doing something!). I did promise you all a new video for this year, but due to issues with the editing software, I haven’t been able to make an updated one. But you can watch part of the one from last year to see how to open and close the flowers.
Remember – this year we are NOT trying to cross-pollinate the flowers. Given the flowers last about a week, and you will hand-pollinate twice per week, you will probably handle each individual flower ten times. So if you were doing you hand-pollinating on monday and thursday, for example, you would do:
Monday - Open and close the flowers 5 times.
Thursday - Open and close the flowers another 5 times.
When each flower has gone grey / floppy, you don't need to hand-pollinate them anymore.
Now, while I only have last year's video, you can still see the method of opening and closing the flowers, which is the same. The video below should start playing at 1:48, and you only need to watch what I do until 2:10 (and I do it again 2:38 – 2:48). You don’t need to do the faffing around that happens afterwards with bits of other flowers, as we showed last year that just opening / closing is equally effective!
This blog is powered by ikiwiki.